Not everyone has access to a makeup artist or hairstylist, but everyone deserves to feel beautiful
I've found myself researching tips on how to best do my own makeup and hair, but especially when it comes to getting ready for a photoshoot! Let me help take some of the stress out of it.
Personally, I didn't start wearing makeup until I was out of high school. I've utilized a multitude of resources and here are a few things I've learned.
Makeup!
Prep!
It's all about the skin prep, baby!
You can't paint over dirt and grime and expect the paint to hold up. The same goes for our faces. Gently exfoliate and cleanse the skin and pat dry with a clean, soft cloth. Don't forget to exfoliate those lips!
Moisture!
I know how much everyone loves that word!
It's true though, whether you have dry skin or oily skin, moisturizing your skin after you've cleansed is super important. If you have dry skin you know the need for the added help. If you have oily skin, you may be tempted to skip this step, but this can actually be counter productive and cause your skin to produce even more oil in order to compensate.
Light Me Up!
When applying your makeup, try your best to apply this in natural lighting. If you apply your makeup under your bright vanity lights, this may distort the hue when you get outdoors or in the studio.
Take Cover!
You may choose to do your make-up a bit "heavier" than on a typical "no make-up make-up" day. Have you ever noticed how performers tend to do this so that the makeup translates to the crowd? The same can apply when it comes to translating to the camera. This particularly goes for your blush and lips, as the color can look washed out.
Prime!
We need something to help smooth out the skin and help our foundation have something to adhere flawlessly to. Find a good primer that works with your skin type. Silicone bases are great for that smoothing effect. Don't forget to prime those eyelids as well. You can also pop a bit of lip balm on your lips to prep them even further before applying the lip products later.
Paint!
You'll want to avoid powder foundation and any foundation that contains SPF. These can cause the skin to appear to have a white cast or white patches when photographed. Make sure your foundation is blended well, as this can also be picked up easily by the camera. Application tip: if your foundation is runny in consistency, you'll want to apply with a foundation brush. If your foundation is thicker, you'll want to use a beauty sponge when applying. If you're opting to use any type of finishing powder, do so with a light hand, and steer away from any of the HD powders.
Chisel!
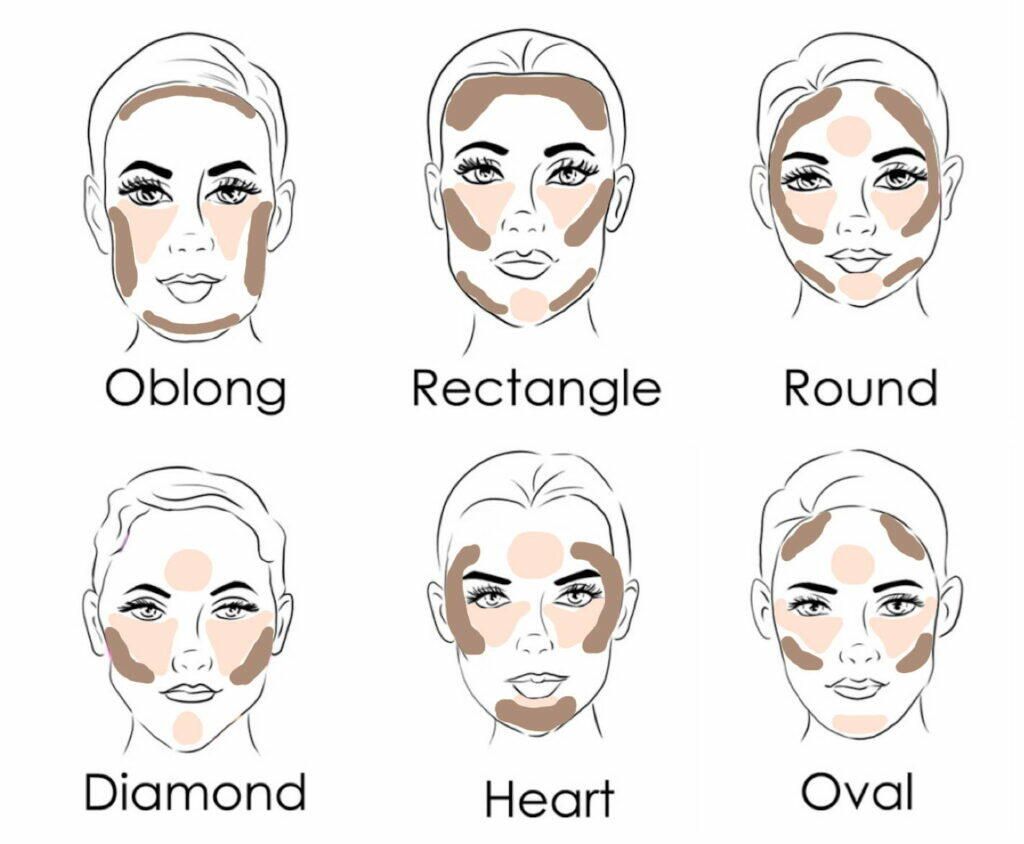
Contouring and highlighting can be a tricky thing to learn, especially because a lot of the tutorials seem to do the same pattern no matter the face shape. Look in the mirror without makeup and take notice of your face shape as this will determine how you go about enhancing the things you want to enhance. Quick tip, anything you highlights gets enhanced and just the opposite for contouring. I have added a photo below to help you see the variety of ways this can be executed.
On Fleek!
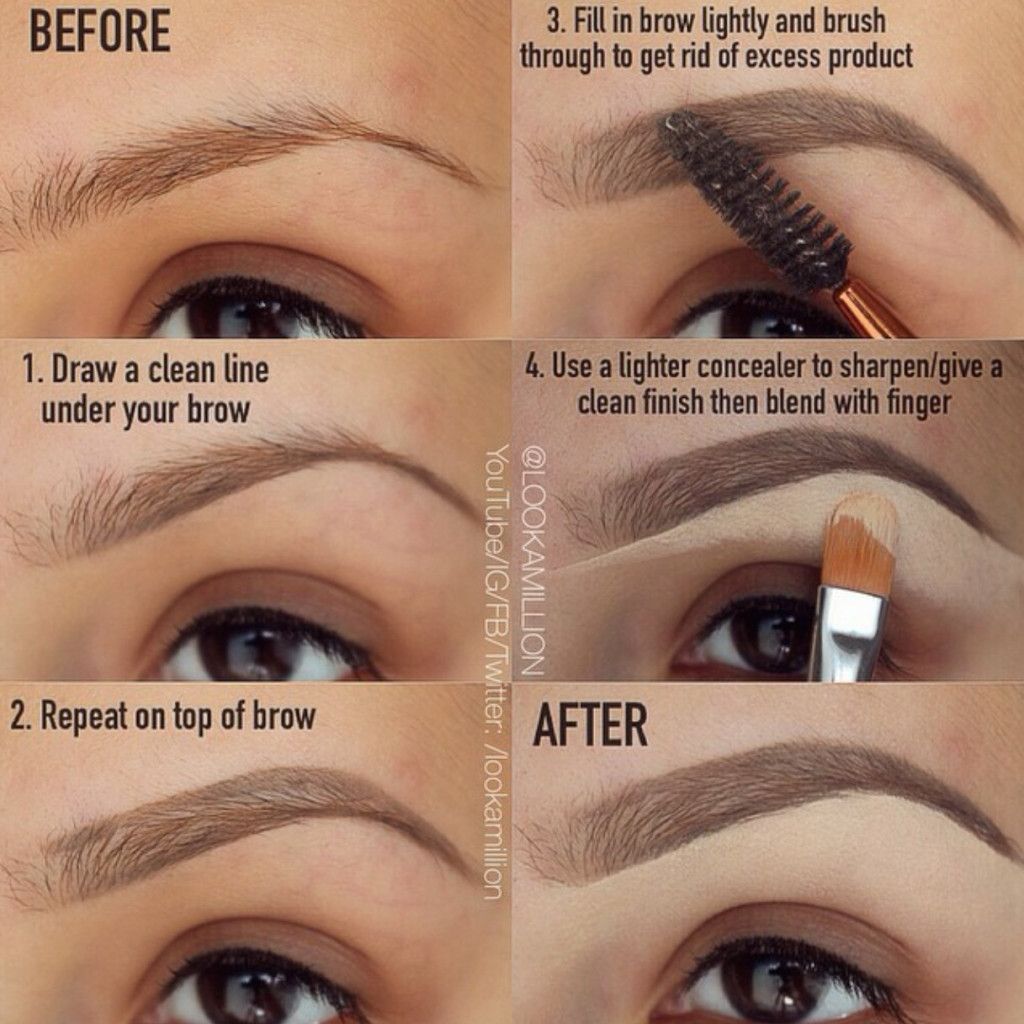
That's right! Brows. I don't know about you, but this is the most difficult in my opinion. You'll want to plan ahead a bit with this to have your brows groomed beforehand; whether you do this yourself or go for a wax. You'll want to stick the natural shape of your brow when filling them in and use a brow gel to help seal it all in. I have also attached a step by step photo if you want to use for reference.
To The Soul!
Eyes are very much a focal point in a lot of photoshoots. This being said, you want to find eyeshadow that will enhance your particular eye color. Blue and green eyes are suited by colors more on the warmer side such as golden or reddish browns, or peach tones. Hazel eyes, pinks, purples, and greys. Us lucky brown eyed girls can choose from any of the above. Don't forget to finish off the look with liner and mascara, and even fake lashes if you'd like a bit more drama.
Practice Makes?
The best way to get confident in something is to practice! Practice your look before the day of your photoshoot so that you'll be prepared. You'll be much more comfortable the day of and it'll be less stressful than trying to come up with a look on the fly. You've got this!
Hair!
Blow Out!
You can easily search how to master a blow out on Youtube or Google. Take into account your natural hair texture and type before going straight in with that hair dryer. If you have curly hair, you may want to skip this step entirely. If your hair gets frizzy easily, you'll want to take extra care in the method and the products you use before doing this step.
Products | Styling!
Using the right products for your type of hair is the key. Steer away from using strong hold sprays as this can make curls look crunchy and stiff; unless this is the look you're going for such as my signature faux hawk.
If curling or straightening your hair, make sure to brush or comb through the hair prior to using the heat tool.
Tame those last minute fly aways with some shine spray or serum to finish off the look.